Wowza Streaming Engine™ media server software periodically tries to connect to the Wowza license server when it starts. If your license is invalid or the computer running Wowza Streaming Engine isn't connected to the Internet, you'll encounter an error.
Some common errors are listed below. Follow the instructions for the error you've encountered to try and resolve the issue. If multiple solutions are provided, try them in the order in which they're presented.
Error: The license key you entered is not valid, or Error: The license key you entered is expired
Solution 1: Enter a valid license key in the field provided.
Confirm the license key you entered is correct. You'll find the license key in the Server.license file located at [install-dir]/conf/Server.license.
Solution 2: If you can't find or don't have a valid license key, contact Customer Service about your account.
Error: Wowza Streaming Engine could not connect to the Internet to validate your license
Solution 1: Verify that the computer running Wowza Streaming Engine is connected to the Internet. Start by troubleshooting your local area network:
- Check your network cables and make sure they're properly seated.
- Check your power cords and make sure they're plugged in and seated.
- If you're on Wi-Fi, check that you're trying to connect over the right network and using the right user name and password.
- Unplug your modem or hub, wait a couple of minutes, and then plug them back in.
- Check with your ISP to make sure there are no outages affecting your connection.
- Make sure that your server, firewalls, and routers are configured to allow outgoing HTTP traffic over TCP port 80.
- Open the Server.xml file, located at [install-dir]/conf/Server.xml, in a text editor.
- Add the following properties to the server-level <Properties> container at the bottom of the file:
Where the [proxy-host] and [proxy-port] values are replaced with a real IP address and port number for your environment.<!-- Properties defined here will be added to the IServer.getProperties() collection --> <Properties> <Property> <Name>licenseServerProxyAddress</Name> <Value>[proxy-host]</Value> </Property> <Property> <Name>licenseServerProxyPort</Name> <Value>[proxy-port]</Value> <Type>Integer</Type> </Property> </Properties>
- If your proxy server requires authentication, add the following additional properties to the server-level <Properties> container:
Where the [proxy-user-name] and [proxy-password] values are replaced with a real username and password for your environment.<Property> <Name>licenseServerProxyUsername</Name> <Value>[proxy-user-name]</Value> </Property> <Property> <Name>licenseServerProxyPassword</Name> <Value>[proxy-password]</Value> </Property>
- Save your changes, and then restart Wowza Streaming Engine.
Solution 3: It's possible the computer running Wowza Streaming Engine may not have access to DNS or may not be able to resolve DNS correctly. To fix this issue, manually add the Wowza license servers to your system's hosts file, which is a text file that the computer uses to map domain names to IP addresses. Because the hosts file is in a protected area of the file system, you must access it from a Command Prompt (Windows) or Terminal (macOS and Linux) window.
Add Wowza license servers to the hosts file (Windows)
- Contact Wowza Support to request the license server's IP addresses.
- In an elevated Command Prompt window, enter the following command:
cd drivers\etc
-
Type notepad hosts to open the hosts file in Notepad.
- Add the following entries to the file, where [license-server-ip] is replaced with the IP addresses provided by Wowza Support that correspond each domain:
[license-server-ip]	wowzalicense1.wowzamedia.com
[license-server-ip]	wowzalicense2.wowzamedia.com
[license-server-ip]	wowzalicense3.wowzamedia.com
[license-server-ip]	wowzalicense4.wowzamedia.com
- Save your changes, and then flush your DNS cache by typing ipconfig /flushdns in an elevated Command Prompt window.
- Restart Wowza Streaming Engine.
Add Wowza license servers to the hosts file (macOS and Linux)
- In a Terminal window, type sudo nano /private/etc/hosts/ (macOS) or sudo nano /etc/hosts (Linux).
- When prompted, enter your password.
- Add the following entries to the file, where [license-server-ip] is replaced with the IP addresses provided by Wowza Support that correspond each domain:
[license-server-ip]	wowzalicense1.wowzamedia.com
[license-server-ip]	wowzalicense2.wowzamedia.com
[license-server-ip]	wowzalicense3.wowzamedia.com
[license-server-ip]	wowzalicense4.wowzamedia.com
- Save your changes by pressing Control+O and then pressing Return.
- Flush your DNS cache by typing dscacheutil -flushcache (macOS) or sudo /etc/init.d/nscd restart (Linux).
Note: Not all Linux distributions run a local DNS caching process. If the Linux response is that nscd isn't available, then you're not running one. - Restart Wowza Streaming Engine.
Error: Wowza Streaming Engine could not access the home directory
Solution: Verify the Wowza Streaming Engine installation directory exists and that the WMSAPP_HOME and WMSCONFIG_HOME environment variables are configured to use this directory.
Environment variables are dynamic values in Unix and Windows-based operating systems that store information that is referenced by a software program, such as Wowza Streaming Engine.
Verify the Streaming Engine install directory and environment variables (Windows)
- In Windows Explorer, navigate to the default install directory for Wowza Streaming Engine, /Program Files (x86)/Wowza Media Systems/Wowza Streaming Engine [version number]/, to confirm its existence. Or search your computer for "Wowza Streaming Engine" to determine its install location.
If you can't locate Wowza Streaming Engine, reinstall it. For help, see Install and configure Wowza Streaming Engine. After you've confirmed that Wowza Streaming Engine is installed and that you know its location on your system, proceed to step 2.
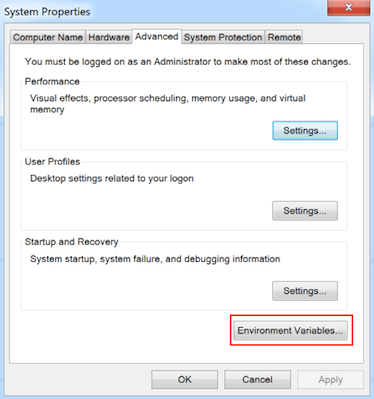
- In Windows, open the System Control Panel and do one of the following:
- (Windows 8) Click Advanced.
- (Windows 7) Click Advanced system settings and then choose the Advanced tab.
- Click Environment Variables.
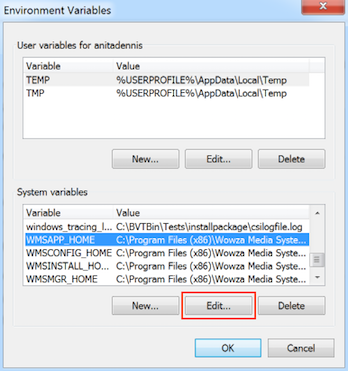
- In the System variables list box, select WMSAPP_HOME, and then click Edit.
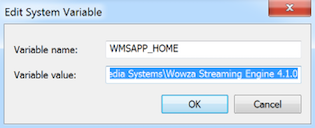
- Make sure the Variable value points to the path for your installed version of Wowza Streaming Engine, as identified in Step 1, and then click OK.
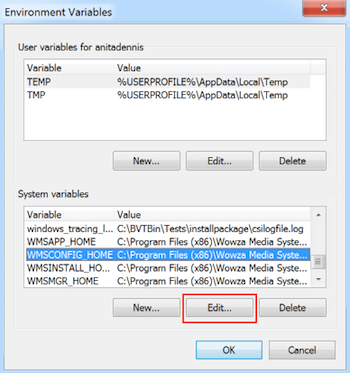
- In the System variables list box, select WMSCONFIG_HOME, and then click Edit.
- Make sure the Variable value points to the path for your installed version of Wowza Streaming Engine, as identified in Step 1.
- Click OK to close the Edit System Variable dialog box, then click OK to close the Environment Variables dialog box, and click OK to close the System Properties dialog box.
- Restart Wowza Streaming Engine.
Verify the Streaming Engine install directory and environment variables (macOS and Linux)
Wowza Streaming Engine configures environment variables automatically on macOS and Linux. They reside in a file called setenv.sh, located at:- macOS – /Library/WowzaStreamingEngine/bin
- Linux – /usr/local/WowzaStreamingEngine/bin
- Navigate to /Library/WowzaStreamingEngine/bin/ (macOS) or /usr/local/WowzaStreamingEngine/bin/ (Linux) and open setenv.sh in a text editor.
- Make sure the following variables are defined:
macOSLinux_EXECJAVA=java WMSAPP_HOME=/Library/WowzaStreamingEngine WMSCONFIG_HOME=/Library/WowzaStreamingEngine WMSCONFIG_URL= export JAVA_TOOL_OPTIONS='-Djava.awt.headless=true' export WMSAPP_HOME WMSCONFIG_HOME JAVA_OPTS _EXECJAVA
_EXECJAVA=java
WMSAPP_HOME=/usr/local/WowzaStreamingEngine
WMSCONFIG_HOME=/usr/local/WowzaStreamingEngine
WMSCONFIG_URL=
export JAVA_TOOL_OPTIONS='-Djava.awt.headless=true'
export WMSAPP_HOME WMSCONFIG_HOME JAVA_OPTS _EXECJAVA
- Save your changes, if you made any, and restart Wowza Streaming Engine.
Error: Wowza Streaming Engine could not write to the server license file (conf/Server.license)
Solution: Make sure you have write permissions for the server license file (Server.license) and then restart Wowza Streaming Engine.
Check permissions (Windows)
- In Windows Explorer, navigate to [install-dir]/conf/Server.license.
For example, if you installed Wowza Streaming Engine in its default location, go to /Program Files (x86)/Wowza Media Systems/Wowza Streaming Engine [version number]/conf/.
- Right-click Server.license and choose Properties.
- Click the Security tab and select your username from the Group or user names list.
- In the Permissions for Users list, make sure Write has a checkmark in the Allow column.
- If Write permission isn't allowed, click Edit.
- In the Permissions for Server.license dialog box, select your username from the Group or user names list.
- In the Permissions for Users list, select the Allow box for the Write permission.
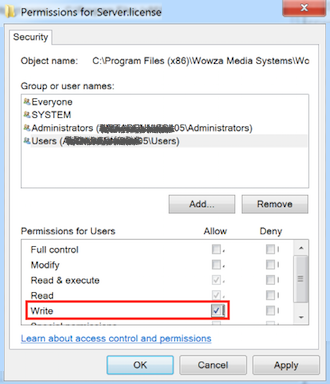
- Click OK to close the Permissions for Server.license dialog box, and click OK again to close the Server.license Properties dialog box.
- Restart Wowza Streaming Engine.
Check permissions (macOS)
- In the Finder, navigate to [install-dir]/conf/.
For example, if you installed Wowza Streaming Engine in its default location, go to /Library/Wowza Streaming Engine [version number]/conf/.
- Click Server.license and press Command+I.
- Under Sharing Permissions, make sure you have Read & Write access. If you don't, either click the lock icon to change permissions for one of the applicable users or contact your system administrator for help.
- Restart Wowza Streaming Engine.
Check permissions (Linux)
- Type ls -l /[install-dir]/conf/.
For example, if you installed Wowza Streaming Engine in its default location, type
ls -l /usr/local/WowzaStreamingEngine-[version number]/conf/
The command returns output that looks something like this:
-rw-r--r-- 1 root root 2453 Feb 19 16:25 /usr/local/WowzaStreamingEngine-[version number]/conf
The first three cluster of dashes and letters indicates permissions for the folder for the owner, the group, and other users, respectively:- r means read permission.
- w means write permission.
- x means execute permission.
- - means no permission.
- To apply write permissions to the contents of the conf folder, type sudo chmod -R ugo+rw [install-dir]/conf/.
For example, if you installed Wowza Streaming Engine in its default location, type
sudo chmod -R ugo+rw /usr/local/WowzaStreamingEngine-[version number]/conf/
- Restart Wowza Streaming Engine.
Error: The license key does not match the host's IP address/MAC address
Solution: Verify that you're using the correct license key on Wowza Streaming Engine.
- Validate that Wowza Streaming Engine is using the correct license key.
The license key that Wowza Streaming Engine is using when it starts is located in the Server.license file located at [install-dir]/conf/Server.license. Compare that key value to the key that you received in the email from Wowza when you purchased Wowza Streaming Engine. The keys should be the same. If they're different, try changing the key in the Server.license file to the key that you received in the order confirmation email. Then, restart Wowza Streaming Engine.
- Confirm that Wowza Streaming Engine is installed on the original, intended server.
Confirm that Wowza Streaming Engine is installed on the same, original computer according to the instructions received with your license key in the email from Wowza. If you've installed Wowza Streaming Engine on new or different hardware, the license key won't work anymore.
- Contact Wowza for further troubleshooting.
If you still can't start Wowza Streaming Engine, reply to the email that you received from Wowza that includes your license key. Explain the problem you're having and attach a zip file that contains the contents of the [install-dir]/conf and the [install-dir]/logs folders.
Generate a temporary license
While you're working on a resolution, you can start Wowza Streaming Engine by clicking the link below and following the instructions onscreen to generate a temporary 6-day license. You'll need your Subscription or Perpetual license key.
Emergency Wowza Streaming Engine 6-day license


